
👨🏫Guide: How I Built an Online Course in One Week
Start generating passive income through an online course

Each week I send a detailed guide on how to start a practical side business to supplement your income during COVID-19.
We all have that one business idea that we’ve been waiting to start.
Maybe it’s selling your famous chocolate chip cookies, or your home-sewn multicolour scrunchies... whatever the idea, something’s been holding you back from taking the next step. I want to change that.
I created One Week Startup to show you how easy it is to take that great idea of yours and start testing it in one week or less.
During COVID-19, I want to get these guides out to anyone whose income has been affected by the crisis so I have one favour to ask, if you value these guides please share with a friend or subscribe yourself!
By subscribing, you’ll get first access to my weekly guides and bonus content on how to build your one-week startup into a permanent side business.
Find all my guides at: oneweekstartup.substack.com
I want to help as many entrepreneurs as possible during the crisis. If you are building a business and need assistance, please reach out to me at: brett@leafforward.org
In this week’s guide, you'll learn…
👩🏫How to pick a topic to teach for your own online course
🎬Recording and producing high quality course content
📈Uploading to online course platforms and enrolling your first students
🔜How to take your course to the next level and create a passive revenue stream
What I’m listening to in quarantine…
How I built an online course in one week
problem
Not sure if you've noticed but quarantine can be boring. Sure, you try to stay productive during the day with work and exercise but once 5pm rolls around, you're glued to your couch watching an episode of Tiger King.
And there's nothing wrong with that, it's not like you can go anywhere, but I've noticed an increasing amount of people looking for more productive ways to spend their time. Just by reading this newsletter, you're in that camp.
The rapid growth of online learning resources has transformed modern education. Whether it's baking bread or making a Tiktok video, learning a new topic or skill is easier than ever. All you need is an Internet connection and an account on a platform like Udemy, Coursera or Skillshare.
While there's obviously a lot of existing online courses, the fast changing nature of technology and our economy always creates opportunities for new content.
And with many people at home looking for new things to learn, now is a good time to create your own course.
solution
A few months ago I listened to this podcast episode by my friend Sam Laliberte (check out her great podcast Freedom Lifestyle). She interviewed a digital nomad whose primary source of income is the creation of online courses. It was a great interview and ever since I heard it, I've been thinking about starting my own course.
The only problem? I couldn't figure out what topic to make a course on. I didn't want it to be so mainstream that I'm competing with well established courses but I also didn't want it to be too niche.
That's when it hit me. I've recently been experimenting with a productivity app called Notion. It’s an all-in-one workspace that does everything from tasks to notes and projects. I love it.
But it’s not the most intuitive software… it’s a bit complicated to get setup and become proficient on. So I thought, why don’t I make a course on it?
And that’s exactly what I did. Over the past week, I’ve been working hard to create a masterclass on how to use Notion. In this week’s guide, I’ll walk you through step-by-step how I did it.
💼what business are we building?
I’m going to show you how I created an online learning course in one week. I’ve chosen to make it on Notion, but you should get a good idea of all the steps required so you can replicate it for whatever subject matter most interests you.
💸why I like this business
As I mentioned above, quarantine is the perfect time to create any type of at-home content. Whether it’s Instagram Live workouts, Tiktok videos, or Netflix, people are bored and looking for content to consume.
Beyond COVID, the growing popularity of online education is undeniable, and I would bet that our shared quarantine experience will only boost interest in e-learning.
From a business standpoint, I like online courses because:
Passive revenue: If you create a great class that your students love, you’ll continue to see enrolments and, subsequently, revenue with minimal ongoing work required. It’s pretty close to a SaaS (software as a service) business model where, once the product is built and has market fit, it generates profit with little additional labour.
Marketing: Online course platforms, like Udemy, will sell your course for you. Although they take 50% of your sales for any enrolments generated through their audience, it’s still a pretty good deal if you’re seeing thousands of enrolments a year with little marketing effort on your end. Once you get big enough, you’ll be able to create your own online course platform and capture 100% of profits.
Audience: If you pick a broad enough topic, your number of potential customers is theoretically in the millions. That’s a huge pond to fish in.
Anyone can do it: While time consuming, nearly anyone can create an online course.
It’s not easy: Although anyone can technically do it, creating a course isn’t easy. You have to be meticulous, patient and prepare to make a bunch of frustrating mistakes. This naturally limits your competition and lets you build a moat around your business.
📈goal
I want to craft the content, film and upload my course in one week. And ideally, acquire my first customer!
resources
Copy these public resources for your own personal use.
📊Notion Workbook – Tasks (click duplicate in the top right to use yourself)
💸Reflection Document – What to consider about after you're done your one week test
👩🏫Course Outline Example (in Notion)day 1: course development
I’m PUMPED to share this week’s guide with you because, unlike other editions of OWS, I spent the last week following every step of it to create my own course - it was a great quarantine activity. I’m a bit behind on the One Week Startup timeline because I wasn’t aware that Udemy takes two days to approve courses, but I should be live either tomorrow or the day after. Over the coming weeks, I’ll update you on progress with this business and continue to share my learnings.
picking a topic
The first step for creating an online course is landing on your topic. There’s no real formula for it, except you should be fairly confident in subject matter. That being said, there’s a number of skills and subject areas that can be learned quickly. For example, I made a course on Notion but have only really used it for a few weeks. This all depends on your ability to quickly learn new things, and the complexity of the topic.
It may be helpful if I walk you through my thinking on why I chose to make a course on Notion:
They just raised a $50m financing round which I expect to be heavily spent on user acquisition, so there’s likely to be increased interest in the software.
While very powerful, Notion isn’t he easiest tool to use. There is a learning curve and I can see a number of interested users searching for additional learning resources.
There are a few Notion courses on Udemy, two of them have over 400 paid students, but neither are particularly slick. My competitive advantage is that I have camera equipment and I’m not afraid to go on camera, so I thought this was a category I could compete well in.
I could sell it as a way to be more organized, productive and focused – three things that everyone wants!
Once you pick a topic, you either have to already be an expert or quickly get up to expert level. To be honest, I learned a lot about Notion while making the course so expect to get better as you go through the material.
Planning content
Types of online course content can be categorized into three buckets:
Screen Capture: Screen capture is you recording your screen as you walk your students through a live demo of the product.
On camera instruction: This is you talking directly to the camera. On camera production is the most difficult of online course content. Unless you’re a broadcasting pro, expect to do multiple takes of each segment.
Slide: Perhaps the easiest form of content to create. It involves you making a slide deck and walking your students through it. What makes it so easy is that you can create a script for each slide and cleanly edit out any mistakes.
I’m going to be honest. I did terrible job at content planning for my Notion course. I did it, mostly, ad hoc and should’ve put way more effort up front into content planning.
To get an idea of what I needed to record, I bought one of my competitor’s Udemy courses and looked at the public course outline of the others. Through that, I could figure out a basic outline for my curriculum. I put together some notes for my first section and started recording.
If I could go back, the first thing I would’ve done is create a detailed outline of my curriculum with all the points I’d want to hit in each video.
In terms of length and format, I’ve noticed that the best selling courses are generally over two hours. The format is usually over 25 lessons between 2-10 minutes in length.
I’ve created a template for this (in Notion) that you can use for your course.
day 2-4: course production
recording screen content
I opted to do most of my content via screen capture. If you’re on a Mac, it’s fairly easy (you can also do this for slide recording). Here are the steps:
1. Open up Quicktime Player
2. Use the shortcut CMD+CTRL+N
3. Click the arrow beside the record button, select your mic
4. Hit record
5. It’ll tell you to click anywhere on the screen when you’re ready to record
6. When you’re done, hit the record button on your main menu bar
The most important consideration when recording screen capture is the audio. I’ve read that this is the most comment complaint students have with courses. I originally thought I’d need a fancy mic but I ended up using my Bose earbuds and they worked fine. I don’t think you need a particularly complex setup but just make sure everything sounds good before you get too far in the course content.
If you’re recording over slides, which I would recommend for a general topic courses, you’re probably best off to write a script to read off of and overlay the audio on to the slides. I’ve done this before using my iPad for the script and MacBook for recording. Remember that editing presentation recordings is pretty quick so don’t worry too much about minor mistakes.
The screen capture method is a bit harder because you have to do it on the fly. I thought about recording the audio and overlaying the screen recording w/o audio over it but felt it would take too long. I’m going to give it a try and report back.
When recording, I usually had short notes on the points that I wanted to hit. I wish I could say recording was easy but each video needed around 2-3 takes before I got it right. Some needed much more. Later on in producing the course, I realized it was easier to record each lesson in segments. For example, one lesson might be recorded in pieces:
1. Introduction to a homepage
2. How to create a new page
3. Creating headers on your home page
4. Dragging the headers into columns to organize your home
5. Adding pages to your home
That’s one video. Splitting the video up makes it easier to focus and hit your key points.
I’ll also add that I found recording a combination of exhausting and frustrating.
Make sure to budget additional time to record new content. As you’re recording, you’ll notice gaps in your course that you’ll want to film additional lessons to film.
If you’re really focused, you could do this in a day but, in all honesty, it took me a few to finish.
recording in-camera content
As I mentioned above, I think one of my competitive advantages among other course makers is my ability to film on-camera content. As an online course consumer. I’m always more inclined to buy from teachers who aren’t afraid to be in front of a camera – a face makes the course more credible.
I’m lucky because a few years ago I had strange aspirations to be a blogger. I never ended up joining the Nelk Boys but I did purchase an expensive camera and less expensive mic. Here’s a picture of my equipment:
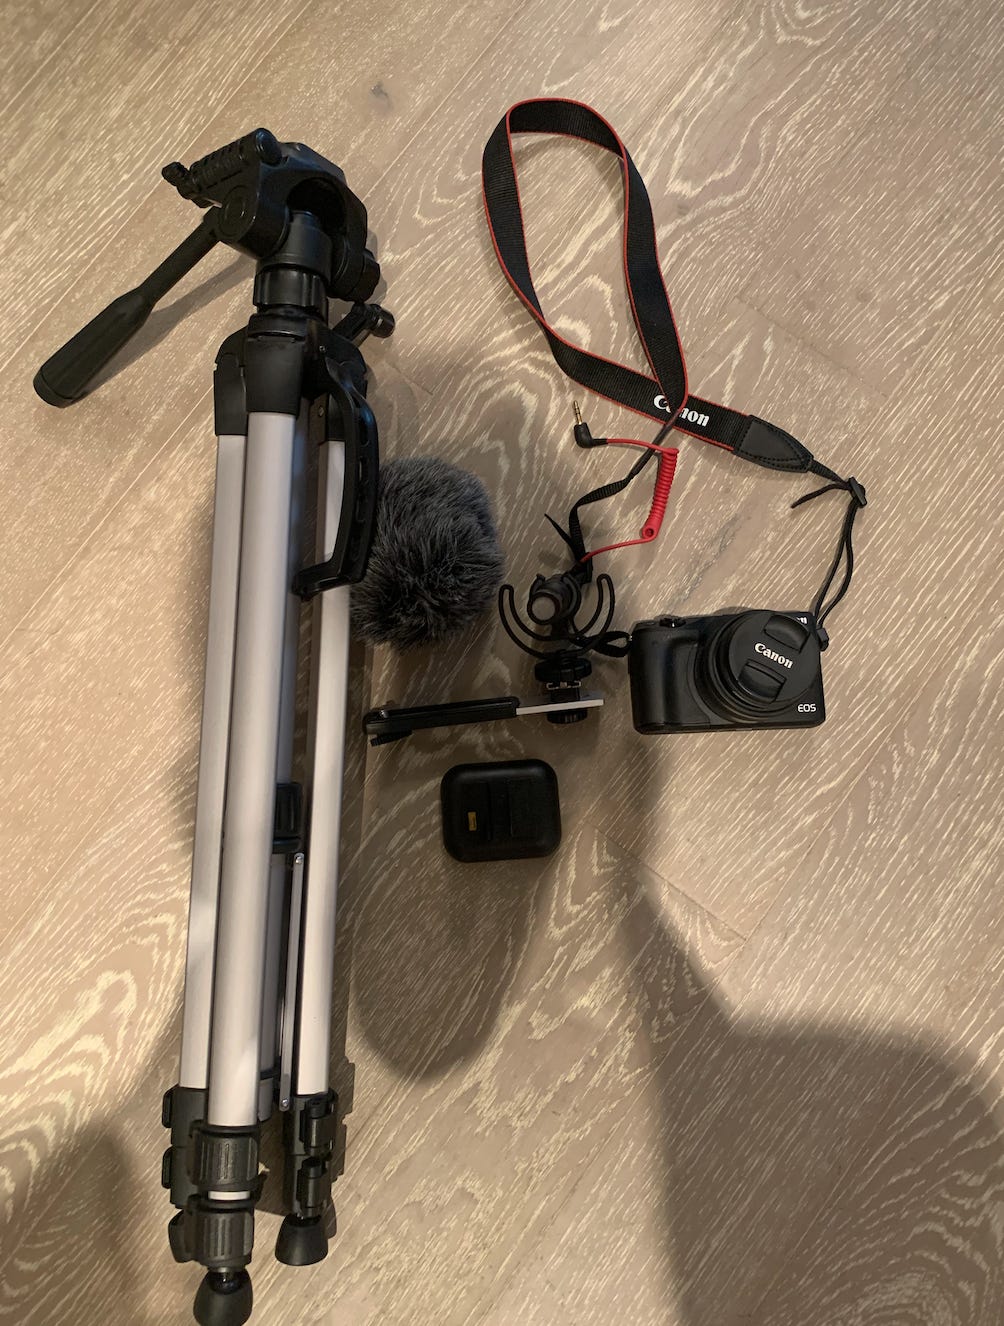
Cannon EOS M3, Rode VideoMicro Compact with adapter, Amazon basic tripod, multiple batteries
I’ve never used the camera to create video but was very impressed with the quality! What any videographer will tell you is that the most important component of any video is the lighting. I thought I’d have to invest in a ring light but after playing around with the lamps in my house realized that they’d be fine. Here’s my setup:

I conveniently have this concrete wall in my condo which makes for a nice background. I put one of my plants on a chair to add some detail to the shot.
I’d recommend a camera like the Canon EOS M3 because it has a flip display which allows you to monitor the shot from the front. This is really helpful for solo shooting.
On the audio, the Rode mic did its job but I’ll probably start looking for something more serious to replace it. I found it picked up too much background noise.
If you don’t have camera equipment and can’t borrow it from someone, I wouldn’t recommend filming a lot of on-camera content. Poor quality footage devalues the course. Instead, I’d recommend trying to record picture-in-picture, where a feed of you talking into your webcam is placed in the corner of your screen share. I’ve seen people use Zoom to record this. I haven’t done it myself but it might be worth a try.
intro video
I planned to shoot a couple of on-camera videos. First, I had to do the marketing/intro video. This is the video that visitors to your course will first see. I watched a couple of them on Udemy and blended together a few of the formats to make my own.
I wrote the script and decided to shoot it line by line. This ended up taking around and hour – and was very tiring!
I wasn’t a fan of the video with just my voice and wanted to add light background music. In researching stock audio to use, I found that Youtube has created a whole library of free audio that you can use in your videos. I ended up going with a light trance track.
The end result? See for yourself

I also shot a few videos to place throughout the course: Congratulations videos to add at the end of sections, a note on my style of teaching, and a summary video at the end.
editing
It should take you at least two full days to film all of your screen recorded and on-camera content. If you’re still with me, great work. You should be happy to know that I found recording the toughest and most tedious part.
I’ve done some basic video editing in the past but nothing serious, so there was a real learning curve to this part. I started by downloading an editing app called Adobe Premiere Rush, it’s a stripped down version of Adobe Premiere. I found it slow and a bit confusing so I tried the full version of Premiere and hated it even more. Both were slow, expensive and unnecessarily complicated. I ain’t got time for that.
I ended up using iMovie which actually worked great. It was easy to use, free on Mac and really fast.
If I were making another course, I would’ve kept really detailed notes on each lesson. Specifically, I’d write down the timestamp of every point where I needed to edit. I didn’t do this so I had to listen through each one and stick it all together. For the ones that I recorded in short segments, this process was a lot easier. The other ones were a slog. Some of them I hated and just re-recorded.
This is another very time consuming activity. It took me at least 4 hours of deep focus to get through editing the screen recordings and on-camera content.
As you’re editing, you’ll also realize issues with the course that you may want to correct, like changing the order of lessons or recording new ones all together. You should account for this when you’re budgeting your time.
The last thing I did was add title slides to each lesson. I designed these in Sketch but you can also use Powerpoint or Keynote. I don’t think this is necessary but it’s a nice touch. If I were to do it again, I’d also create summary slides for the end of each lesson.
exporting
Once you’re done with editing, you’ll need to export the videos. This is a step I didn’t really think about a lot and while it isn’t particularly hard, but you do need to give yourself some time. Each video, depending on its length and the speed of your computer, will take approximately 10-40 minutes to process.
To organize everything, I created a FINAL folder in my document where I captured all of the exported content.
I organized them by name, not lesson number, because the order of the lessons was always changing.
day 5: course publishing
platforms
If you’ve gotten this far, excellent work – I did all of this last week so I know how hard it is to pull together. At this point, you should have all of your content ready to be published.
The first step is to figure out which platforms you’re going to publish on. Each service has a different commission format for creators so you want to get an idea of that before you commit. I’ve done some basic research on this and here’s what I found:
Udemy: 50% of the course fees go to creators if the student is acquired through their platform. 3% goes to Udemy if the student uses the creator’s code, 97% goes to you.
skillshare: they offer a unpublished commission commitment on videos based on how many minutes viewed.
To maximize the reach of your course, I’d encourage you to upload on both platforms.
Each platform has their own requirement for what you can upload to your course’s page. I’ve included a short summary of what you should prepare.
copy
As you’re uploading to the different platforms, you’ll need to have copy for your course page. I looked at similar courses of mine for inspiration. Here’s what I came up with:
Do you want to become more organized, focused and productive in your personal and professional lives? This course is for you.
Notion is a powerful all-in-one workspace that you can use to write, plan, collaborate, and get organized.
Adopted by organizations such as McDonald’s, Lululemon, and Nike, thousands of passionate users rely on Notion to manage tasks, organize projects, draft notes, study, and plan life goals.
Notion can be difficult to setup, due to the nature of the software.
In this masterclass, we’ll cover everything you need to know about Notion so you can start optimizing your productivity workflow, today.
I designed this course for new and existing users to Notion. Whether you never heard of Notion or you are an expert, you can start from the beginning of the course or jump ahead to more advanced sections.
In this course, we’ll cover:
The basics of Notion: We’ll get you setup on the tool and make you familiar with Notion’s many features
Get more productive, today: This course will provide real life examples of how you can apply it in your daily personal and professional life to improve your organization and productivity.
Tips and tricks: I’ll share with you my personal workflow and how I use Notion to optimize my productivity and live a better life.
Templates: You’ll receive access to over 20 professionally made templates that you can clone and use in your own workspace.
I’m passionate about Notion because I use it everyday to be more focused, organized and productive.
If you’re struggling to manage your hectic work and personal lives, this course is for you.
I’ll share how you can use Notion’s powerful feature set to
If you’re ready to use Notion to better manage your hectic life using its powerful set of features, this course is for you.
display photo
You’ll need to find an image to promote your course with. A lot of instructors use general stock photos, but I believe that a custom image enhances the legitimacy of the course and improves conversion. This is what I created:

lesson by lesson description
You’re going to need to write a short one line description of each lesson and what your students can expect to learn from it.
resources
If you have any additional content that you want students to be able to access, you’ll need to upload them in the resource section for each lesson. I created custom Notion templates for each lesson that students can clone and adapt for their own productivity needs.
day 6-7: sales and marketing
As you can probably get a feel for, the time consuming portion of this One Week Startup is the creation of the content. But once the content is done, you’ve got a product that almost sells it self.
One of the reasons why selling online courses is a great business is because you get to tap into the existing audiences of the online learning platforms that you upload too.
Because of how their commission structures are set-up, it’s in Udemy and Skillshare’s best interest to sell your course so they’ll do a lot of the heavy lifting. A main driver behind me starting this Notion course was seeing how many students were enrolled in my inferior competitors. My thinking is that if they can do it, why can’t I?
I’ve never done this before so we’ll see in real time how accurate this thesis is. On that point, it does take Udemy and Skillshare approximately two business days to review your course. Mine is currently sitting in review and I hope to have it online soon!
But you shouldn’t rely solely on the platform. Since you get a higher commission on sales you personally bring to the platform, you should search for different channels to promote your course.
community
Notion has an active community that’s passionate about the power of the product. I’ll start by searching for their forums, subreddits and Slack groups.
I’ll share my course and offer my promo code in a message that aligns with the tone of their group. I doubt that power users will be interested but they may no someone who they’ve recently introduced Notion to who could find value in the course.
youtube
I created a bunch of content for the course that could be easily repurposed for Youtube. I’ll edit a series of videos, upload them to Youtube and promote the course in the description and video intro.
friends and family
As always, I’ll look for any friends and family who might be interested in the course and offer them a discount. Unlike other businesses I’ve covered in the One Week Startup, this course is fairly specific so the number of prospective customers within my network will be limited.
day 7: reflection
That was hard. I know it because I DID IT! But it’s incredible that you did too and you should be proud of yourself. This is the part of the guide where we take a second to reflect. Think through what went well and what you could improve on.
There’s a bunch that I could’ve done better, including:
Spent more time on content planning. I should’ve put together a detailed curriculum with notes for each lesson.
Speaking notes, I should’ve taken more of them. It would’ve been very helpful to take note of the timestamp at each moment where I felt there could be improvement. Not only would this have helped with editing, but it would also have made the course content better.
If I had more time, I would’ve created summaries for each lesson and section. I always find summaries make it easier to digest large of amounts of information.
And much more…
As always, I’m sharing with you this doc to use for your day of reflection.
next steps
The challenge with Udemy and Skillshare is while they are motivated to market your course to their audience, it’s still their audience. You don’t have the contact information of your students and can’t encourage them to share the course, or cross sell them on other content. It doesn’t help that Udemy and Skillshare also take 50% of your margin…
If your course does well on Udemy or Skillshare, that’s great validation that you should continue to build out the business. My recommendation on the next step is to use a tool like Thinkific or Teachable to create your own independent course page. This way, you own the customer and capture all of the margin.
If your course has any staying power, you could use this to build a beautiful passive revenue stream. To market your course, I’d encourage you to continue to build content on Youtube and your own blog.
Wow! very helpful. I have tried to make a course 2 times and I quit during recording. It is eye opening to see how much work it takes for this venture I think I have been trying the wrong thing.
From my experience your tips and notes for improvement are spot on.